Guide to Installing Your Pool Liner
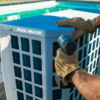
Draining the Pool
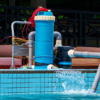
Draining the pool is a critical first step in replacing your pool liner. A submersible pump, often used for its effectiveness, will remove the water quickly. Alternatively, you might consider setting up a siphon. This method can be useful, especially if you are dealing with a situation that does not allow for electronic pumping solutions. It’s crucial that every drop of water is evacuated from the pool to prepare the surface for a new liner. Any remaining moisture can hinder the installation process causing potential fitting issues with the new liner.
When engaging in this pumping action, position the hose so that it channels water away from the pool area to prevent any flooding or unintended water damage nearby. It also pays to keep shifting the hose’s exit point. This strategy disperses the water discharge, avoiding over-saturation of any single area which may lead to erosion or other complications.
Always be thorough in checking that no pools of water are left behind, especially in lower areas of the pool’s surface. After this, you’re all set for the next stage where you’ll remove the existing lining. Efficient draining ensures that the structure is ready for the precise and smooth installation of a new liner, thereby extending the lifespan and enjoyment of your pool.

Preparing the Pool Base
Once the water has been fully removed, your next step involves preparing the pool base, ensuring it’s in optimal condition to welcome the new liner. If your pool has a sand base, inspect it carefully for any irregularities. Use a broad flat shovel to gently even out high spots and fill in the low areas. Creating a level surface is key as it influences how well the new liner will fit and avoid premature wear.
For those with a concrete base, a bit more effort might be required. Start by sweeping away all debris to prevent any sharp particles from puncturing the new liner. If you spot any cracks or uneven areas, applying a patching compound will be necessary. Make sure the patches are smooth and level with the rest of the pool floor. Even small gaps or roughness can lead to bigger issues once the pool is in use.
Regardless of your pool’s base type, paying attention to the edges and corners is crucial. These areas tend to be prone to wear and tear, potentially leading to leaks. Ensuring they are smoothly transitioned and free from sharp angles helps protect the integrity of your installation. Once you’re satisfied with the base condition, take a moment to go over it once more, looking for any spots that might have been missed the first time. Perfecting the base prep extends the lifespan of your pool liner and enhances the overall aesthetics of your pool once filled.
With a well-prepared base, the next steps in your liner replacement project will progress smoother, paving the way for a finish that’s both visually pleasing and leak-free. Investing time in this phase is a helpful assurance against future problems, ensuring your pool remains a cherished feature of your home for years to come.

Installing the New Liner
To seamlessly integrate the new pool liner, start by unfolding it and spreading it evenly across the pool’s surface. Handle the liner with care to avoid any unnecessary tears or stretches. Place the liner centrally and then unfold it outwards to the walls, ensuring it’s aligned with the pool’s shape without any twisting or misplacement. If you’re working with a beaded liner, it simply snaps into a track along the pool’s edge, requiring careful alignment to ensure a precise fit.
For overlap liners, you’ll manually adjust and secure the liner over the pool wall. It’s essential to do this evenly around the perimeter to maintain consistent tension and avoid uneven overlaps that could lead to potential issues in the future. There should be just enough material draped over the wall to secure it in place, but not so much as to cause sagging.
Once the liner is positioned, using a vacuum specifically designed for liner installation can make a tremendous difference. Position the vacuum’s hose underneath the liner and secure it so it doesn’t shift. Turning on the vacuum will remove air from between the liner and the pool walls and floor, pulling the liner tight against the surface. This action eliminates wrinkles and helps verify that the liner is positioned accurately before any water is added.
Keep the vacuum running until you’ve begun to fill the pool with water. The weight of the water will further help to press the liner tightly against the base and sides of the pool. Start filling the pool with water slowly, monitoring for any shifts in the liner position. During this stage, pay close attention to how the liner settles. The water will help you spot any areas where adjustments might be needed. These areas are typically where slight wrinkles or folds appear, suggesting areas where the liner needs to be gently tugged or smoothed out.
The process of securing water inside the liner forms another critical checkpoint. As you add water, occasionally step back to examine the overlay or bead along the pool’s perimeter. Consistency here is key to ensuring a tight and even fit around the entirety of your pool. Only once the liner has begun to stabilize with the weight of the water should you trim off any excess material from the overlap.
When about a foot of water covers the entire surface of your pool floor—ensuring all sections of your liner are well-seated—turn off the vacuum. At this point, proceed to reinstall any fixtures like return jet faceplates and skimmers, being careful not to torque the screws too tight initially, as excess force could deform the new liner or damage its seal.
Following these careful steps during installation secures your pool liner effectively and ensures its durability and performance. With these precautions and precise installations steps, the newly installed pool liner is not just a revamp in aesthetics but a guarantee of extended functionality for your swimming pool.